
Mitigating block
The mitigating block can be used as a reversal model as well as a trend continuation model. It represents an impulsively broken orderblock. The main difference from the breaker is the absence of liquidity gathering.
Bullish Mitigating Block
Price should test the support zone and then form a higher low (HL) before momentum. The mithigating block is confirmed by an impulsive breakdown throug the orderblock. The highest rising candle of the broken high, will act as a bullish mitigating block.

When the price returns to mitigation block area, it will be a bullish set- up, which can be considered for finding an entry point into the position.
The mitigation block is defined with the shadows of the pierced orderblock.
Before the impulse breakout, the price can test or trade in a bearish (OB) without going over its upper boundary: this will not affect the relevance of the future mitigation block.

When price returns to the mitigation block, you may see a its trading in this range. Often the price reaccumulates and continues the uptrend.
For more effective use of the tool, use 50%/full fill of the FVG in combination with the mitigation block.

Stop Loss
The stop loss can be placed under the mitigation block - this is considered as an aggressive stop, which has a high probability of being removed, but allows you to open a position with a high ratio of risk to profit.
You can also put a stop loss behind the low that formed the (HL) - this is considered as a conservative stop loss
Bearish Mitigation Block
Price should test the resistance zone and then form a lower high (LH) before an impulse. The mitigation block is confirmed by an impulsive breakdown throug the orderblock. The lowest falling candlestick of the broken minimum will act as a bearish mitigating block.

When the price returns to mitigation block area, it will be a bearish set-up, which can be considered for finding an entry point into the position.
The mitigation block is defined with the shadows of the pierced orderblock.
Before the impulse breakout, the price can test or trade in a bullish OB without going over its lower boundary: this will not affect the relevance of the future mitigation block.
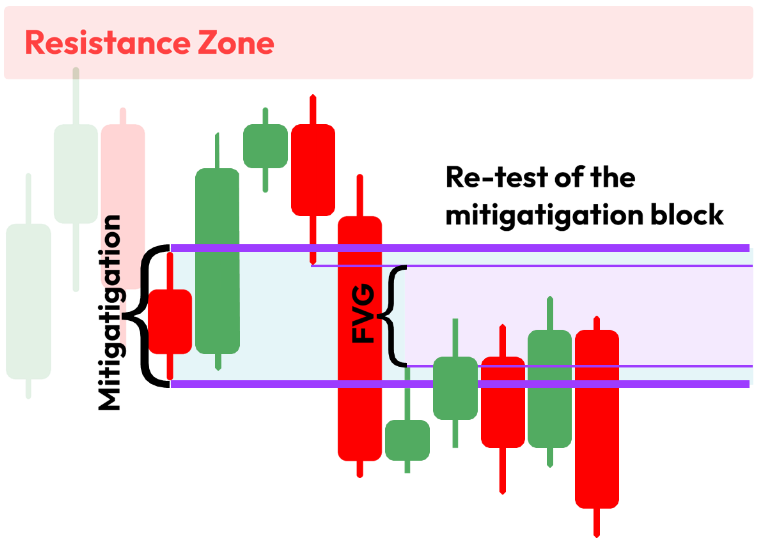
When price returns to the mitigation block, you may see a its trading in this range. Often the price reaccumulates and continues the downtrend.
For more effective use of the tool, use 50%/full fill of the FVG in combination with the mitigation block.

Stop Loss
The stop loss can be placed over the mitigation block - this is considered as an aggressive stop, which has a high probability of being taken out, but allows you to open a position with a high ratio of risk to profit.
You can also put a stop loss over the high that formed the (LH) - this is considered as a conservative stop loss
The main criteria for the formation of the Mitigation block:
Test of the support/resistance zone;
No removal of the liquidity, the formation of (HL)/(LH);
Impulsive breakthrough the orderblock.